How to launch a satellite
Published: March 2025
Satellites are now essential in the space industry, with over 10,000 orbiting the Earth, and that number keeps climbing. Why? Building satellites has become more accessible, almost like assembling a high-tech Lego set. Here’s a quick guide on how it all comes together:
Step 1: Define Your Mission
Start by defining your mission. What do you want to achieve, and what will your satellite need to do? Is one satellite enough, or will you need a fleet? Do you even need a satellite? Large amounts of open-source geospatial data are available that may forgo the need to put your own bird up in the sky! If you have developed a payload for a satellite or a space instrument, you may not need to build your own satellite There are companies that provide space on their spacecraft to host the payload. It is important to decide whether you will build the payload and satellite elements yourself or buy them from other companies. The budget of your mission will depend on this decision - It's more expensive to develop satellite components yourself.
Step 2: Pick Your Orbit and Inclination
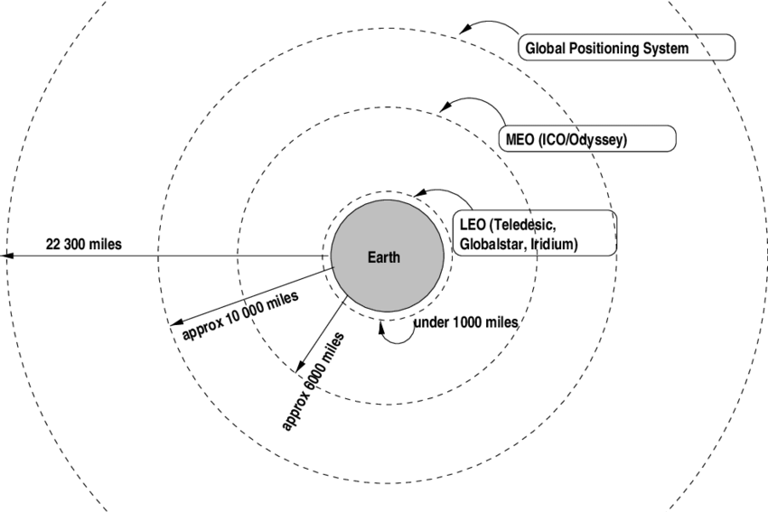
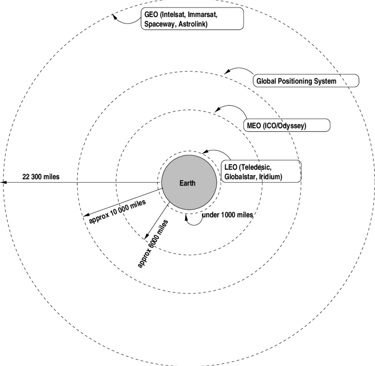
Choose the right orbit for your mission. Lower orbits (~700 km) work well for Earth observation and can be observed with less powerful cameras. But if you need a broader view, you might need a higher orbit and a more powerful camera. The following factors usually influence the choice of orbit:
Revisit time of the area of interest. Duration of the satellite's communication session with the ground station to maximize downlink.
Payload parameters. The chosen orbit parameters and payload specifications will serve as the input data for further development.
Step 3: Get Your Gear
Decide which satellite components to build yourself and which to buy. This is where it gets interesting—do you want to design everything from scratch or just buy the best parts available?
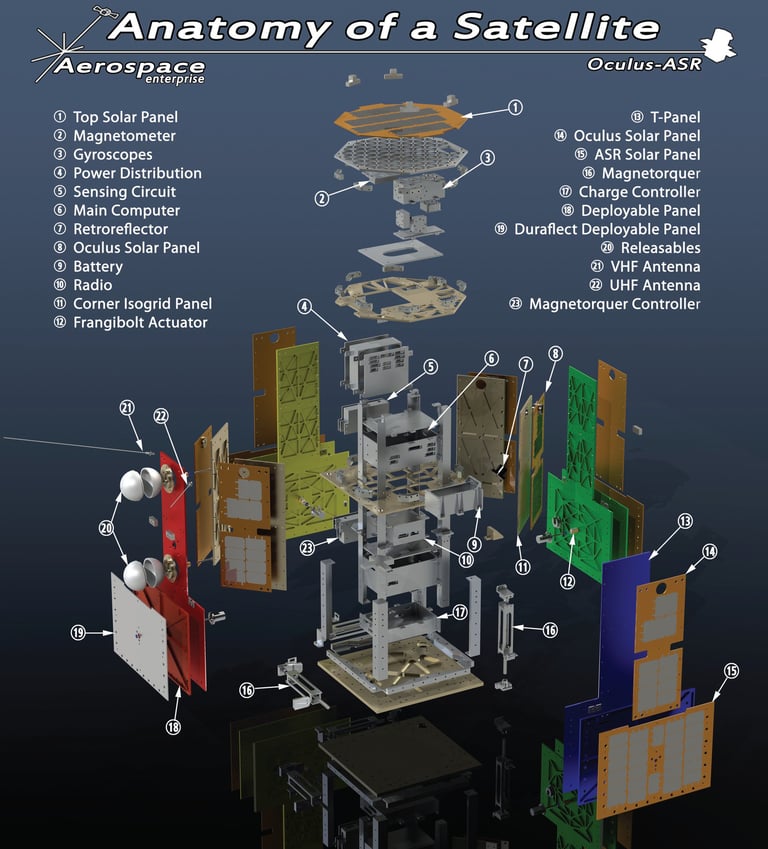
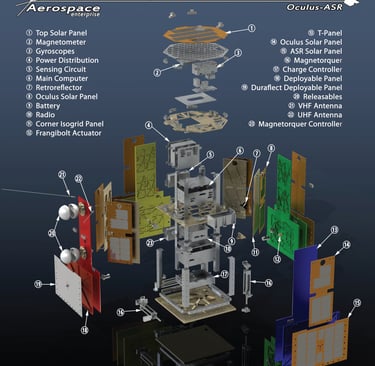
At a high level this is what a Satellite consists of:
On-board Computer: This is the satellite's brain, handling all the critical calculations, sending commands, and managing tasks across various subsystems.
Electric Power System: This system powers the satellite, typically combining batteries and solar panels to ensure a steady supply of electricity while also keeping the batteries charged.
Communication System: This is the satellite’s link to Earth. It usually includes an antenna for receiving commands from Earth and sending data back.
Control System: This system is responsible for the satellite's movement and positioning in space. It includes engines, magnetic coils, and reaction wheels to control its orientation and maintain the desired orbit. Navigation tools like GPS are often part of this system.
Payload and Support Systems: These are the mission-specific parts of the satellite, designed to perform tasks such as capturing images, collecting scientific data, or enabling communication.
When building a satellite, one of the big decisions is whether to develop components in-house or buy them from suppliers. With the advancement of technology, it's become easier to purchase ready-made parts from companies like Reflex Aerospace, EnduroSat, and Satlantis. However, integrating these components into a fully functioning satellite is no small feat—it demands expertise and careful planning. For first-time missions, leaning on customer support from hardware manufacturers can save you a lot of time and headaches down the road.
Step 4: Build and Test
Assemble your satellite in a clean room—think of it as surgery for technology, where even a speck of dust can cause problems. Once built, test it rigorously. You need to simulate the harsh conditions of launch and space to ensure everything works perfectly.
Step 5: Licence to Launch
Send your satellite to the launch site and get ready for lift-off. But don’t forget the paperwork—legal approvals are crucial, and you’ll need to coordinate with organizations like the FAA, FCC, and get local environmental agencies to sign off on your payload. If you work with a 3rd party satellite integrator, they can help you with this process.
Step 6: Control the Mission
Set up your Mission Control Centre. This is where all the magic happens—controlling your satellite, receiving data, and ensuring everything runs smoothly. This ground station can either be built your own or rented, depending on your needs.
And while building and launching a satellite is exciting and a feat of engineering here’s the twist: not every space mission needs its own satellite. You can hitch a ride on someone else's satellite or buy existing satellite data to start with. This is great if your budget is tight or you want to focus on the data rather than the hardware. There is endless opportunities to build with the existing terabytes of data being piped down from space to every second!
Coming Soon
How to get to space.